
Every time I need to allow access to a Samba directory after reinstalling my Debian system, I follow another tutorial.
I always forget from one time to the next because it can be three years between reboots.
So here's my tutorial, for me and for you, as it will certainly come in handy.
I'll update this tutorial as new Debian versions are released, both for myself and for you.
Our goals today:
- Mount the
/mnt/DATA/directory at boot using disks, the graphical application - Install Samba
- Configure Samba for a public share accessible in read-only mode (
/mnt/DATA/Public) - Configure Samba for a private share with authentication for read/write access (
/mnt/DATA)
1. Before You Start
It's preferable to be in the sudoers list, but it's not mandatory; you can do this as a superuser (using the su command).
I should note that connecting with su is a bad habit I have too often.
2. Verifications
To avoid any confusion, let's check these elements:
- Verify that the public directory exists and has the correct permissions.
- Do the same for the private directory.
- Check if your private user account exists.
|
# Vérifions que nos répertoire existe, privée et publique |
ls -ld /mnt/DATA /mnt/DATA/Public |
|
# Vérifion si le disque DATA est monté au démarrage |
mount | grep DATA |
|
# Regardons si notre utilisateur stunivers est connu du système : |
id stunivers |
|
Here is the output we obtained in our case:
# ls -ld /mnt/DDAS /mnt/DDAS/Public |
|
drwxrwx--- 15 stunivers 1005 4096 18 mai 12:52 /mnt/DATA |
drwxrwxrwx 6 stunivers stunivers 4096 18 mai 13:37 /mnt/DATA/Public |
|
# mount | grep DATA |
|
# id stunivers |
|
uid=1000(stunivers) gid=1000(stunivers) groupes=1000(stunivers),24(cdrom),25(floppy),29(audio),30(dip),44(video),46(plugdev),100(users),101(netdev),102(scanner),106(bluetooth),108(lpadmin) |
|
2. Automatic Mounting
Mounting makes your volume, USB key, or hard drive visible and accessible to the system.
On Linux, depending on distributions, and for security reasons, it's not automatic like on Windows.
Here, in our case, we want it to be.
Back then, I used to edit /etc/fstab until I got the automatic mounting working. It’s a matter of syntax, but with my dyslexia, I often missed things.
In fact, Disks is much more practical for me; you can find it in your GNOME applications:
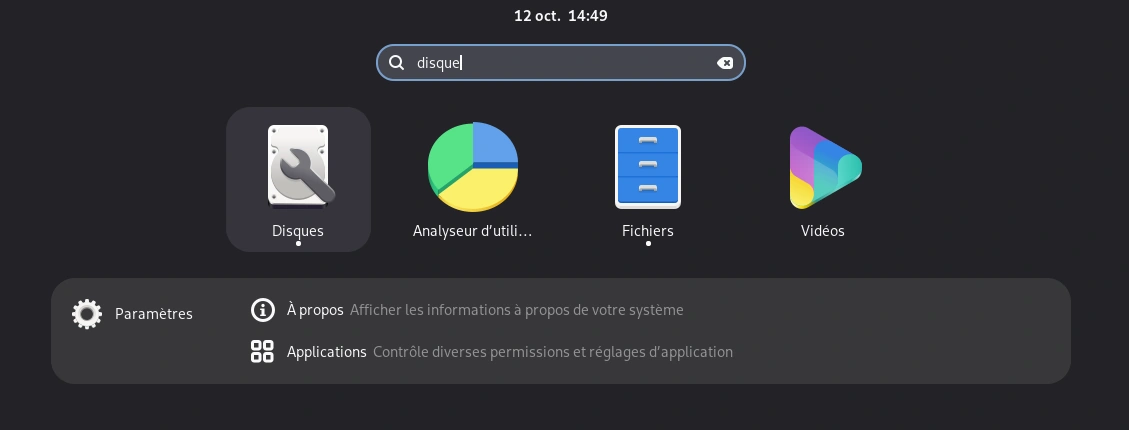
Once in Disks, you can configure something like this:
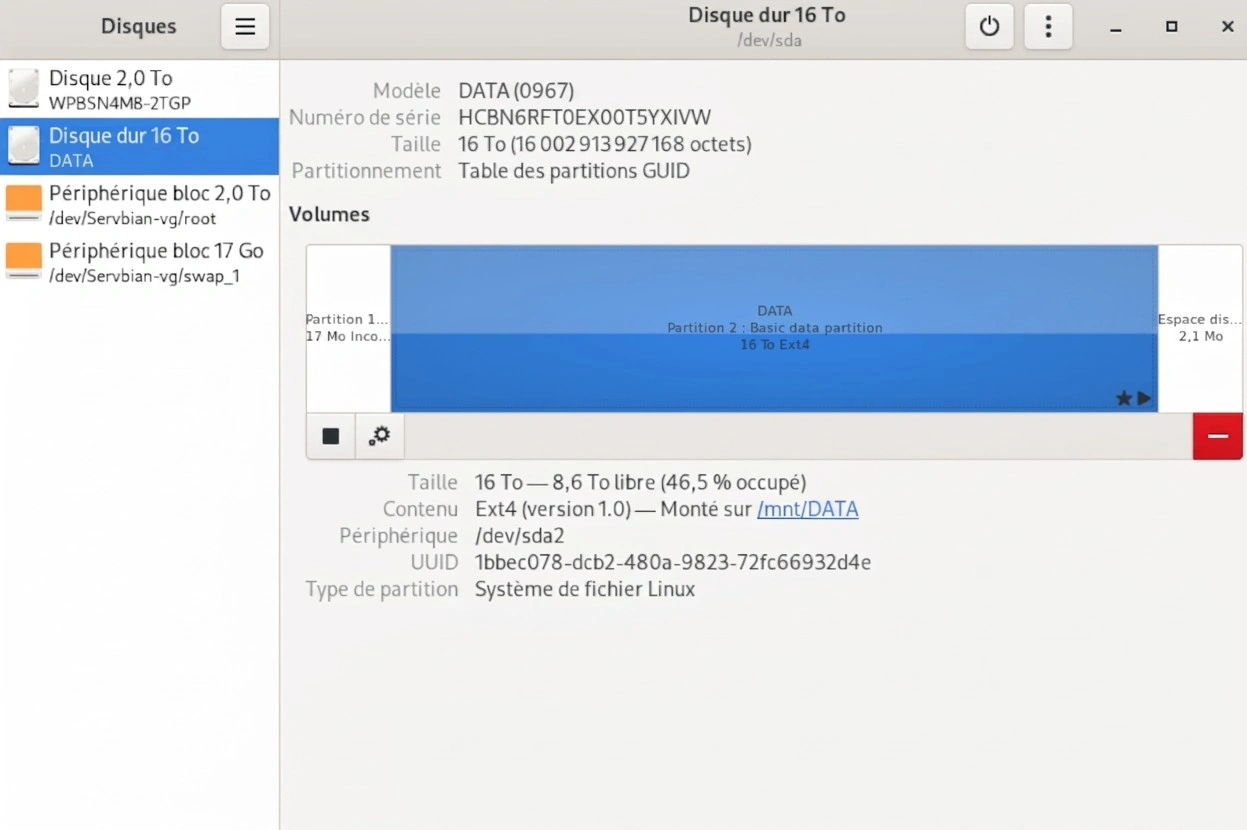
The idea is to have automatic mounting and a name that corresponds to what we want.
Let's verify again:
|
mount | grep DDAS |
/dev/sda2 on /mnt/DATA type ext4 (rw,nosuid,nodev,relatime,x-gvfs-show) |
|
3. Installation of Samba
It’s quite simple: update the system, then use apt to install it:
|
sudo apt update |
sudo apt install samba |
|
Check that everything is in place:
|
# on liste les 3 binaires smbd, nmbd et testparm |
ls -l /usr/sbin/smbd /usr/sbin/nmbd /usr/bin/testparm |
|
# Samba est lancé en service, on vérifie le status |
systemctl status smbd nmbd --no-pager |
|
4. Writing our smb.conf
4.1. Backup the Original File
Just in case we make a mistake, let's back it up:
|
# Sauvegarde avec la date |
sudo cp -a /etc/samba/smb.conf /etc/samba/smb.conf.bak.$(date +%F) |
|
For a rollback if needed:
sudo cp -a /etc/samba/smb.conf.bak.AAAA-MM-JJ /etc/samba/smb.conf |
sudo systemctl restart smbd nmbd |
4.2. Writing our smb.conf
Here’s the content we’ll use to replace the original file, with additions and adjustments tailored to our needs:
[global] |
workgroup = WORKGROUP |
server string = Servbian DATA |
security = user |
map to guest = Bad User |
guest account = nobody |
|
# Hide shares the connecting identity cannot access |
access based share enum = yes |
|
# Useful on a home LAN; adjust if you use a domain later |
server role = standalone server |
disable netbios = no |
smb ports = 445 139 |
|
logging = file |
log file = /var/log/samba/log.%m |
max log size = 1000 |
|
# ----------------------------------------------------------------------------- |
# Authenticated only: full DATA tree for user stunivers |
# Not listed for anonymous / guest clients thanks to access based share enum |
# ----------------------------------------------------------------------------- |
[DATA] |
comment = Private DATA storage |
path = /mnt/DATA |
valid users = stunivers |
browseable = yes |
guest ok = no |
read only = no |
force user = stunivers |
create mask = 0660 |
directory mask = 0770 |
veto files = /lost+found/ |
|
# ----------------------------------------------------------------------------- |
# Guest-visible public folder |
# ----------------------------------------------------------------------------- |
[Public] |
comment = Public folder (no login required) |
path = /mnt/DATA/Public |
browseable = yes |
guest ok = yes |
read only = no |
force user = stunivers |
create mask = 0664 |
directory mask = 0775 |
Key points:
map to guest = Bad User: an unknown or empty login falls back to a guest account (nobody).access based share enum = yes+valid users = stuniverson[DATA]: without logging in, the client should only see[Public].force user = stunivers: files created via SMB belong tostuniverson the disk (consistent with your current directory structure).guest ok = yesonly for[Public].
I really took my time to set up the cleanest configuration possible, ensuring nothing was left exposed.
5. Validate the Syntax of the File
One great thing about Samba is that it won't let you write your smb.conf file and then return silly errors.
The utility testparm, included with Samba, is very useful for validating your smb.conf file:
testparm -s |
Load smb config files from /etc/samba/smb.conf |
lpcfg_do_global_parameter: WARNING: The "raw NTLMv2 auth" option is deprecated |
Loaded services file OK. |
Weak crypto is allowed by GnuTLS (e.g. NTLM as a compatibility fallback) |
|
Server role: ROLE_STANDALONE |
Normally, the command should return a header similar to this, confirm that the files are okay, and spit out the contents of your smb.conf again.
For those concerned about Weak crypto being allowed, note that Debian allows compatibility even down to SMB 1. On our side, we enforce SMB 3 to take advantage of its security improvements.
6. Create Your Samba User
Samba doesn't know about Stunivers; in fact, the users on your Debian system and those in Samba are distinct.
Therefore, you need to create a Samba user:
|
sudo smbpasswd -a stunivers |
New SMB password: |
Retype new SMB password: |
Added user stunivers. |
|
7. Access Rights
As you can see, we have a private directory structure /mnt/DATA, and /mnt/DATA/Public or Public is within DATA.
Therefore, it's important that no additional rights are granted to any other Unix group besides Stunivers.
Let’s ensure the permissions are consistent for the stunivers user:
|
# Changement de propriétaire pour l'utilisateur stunivers |
sudo chown -R stunivers:stunivers /mnt/DATA/ |
|
# Redéfinission des droits au cas ou pour DATA (stunivers à les droits, les autres rien) |
sudo chmod -R 770 /mnt/DATA/ |
|
# en publique c'est autre chose, on veut que stunivers est tous les droits, et des droits en lecture pour les autres |
sudo chmod -R 775 /mnt/DATA/Public/ |
|
Why use chmod -R and chown -R? There's always a moment when you forget a permission or things don't go as expected.
It may seem radical, but I prefer to be thorough once and for all.
A quick check with ls confirms everything is set:
ls -ld /mnt/DATA/ |
ls -ld /mnt/DATA/Public/ |
7. Restart the Services
Restarting the services is crucial because your Samba server defaults to recognizing the old smb.conf file.
Additionally, we need to ensure that our server service starts at boot and force the stop of nmbd (for NetBIOS), which is no longer in use.
sudo systemctl enable --now smbd |
sudo systemctl disable --now nmbd |
sudo systemctl status smbd --no-pager |
If you haven't made any mistakes in your smb.conf and verified with testparm, you should see something like this:
|
sudo systemctl enable --now smbd |
sudo systemctl disable --now nmbd |
sudo systemctl status smbd --no-pager |
Synchronizing state of smbd.service with SysV service script with /usr/lib/systemd/systemd-sysv-install. |
Executing: /usr/lib/systemd/systemd-sysv-install enable smbd |
Synchronizing state of nmbd.service with SysV service script with /usr/lib/systemd/systemd-sysv-install. |
Executing: /usr/lib/systemd/systemd-sysv-install disable nmbd |
Removed '/etc/systemd/system/multi-user.target.wants/nmbd.service'. |
Removed '/etc/systemd/system/nmb.service'. |
● smbd.service - Samba SMB Daemon |
Loaded: loaded (/usr/lib/systemd/system/smbd.service; enabled; preset: enabled) |
Active: active (running) since Mon 2026-10-12 14:55:09 CEST; 40min ago |
Invocation: e0631a439d694b7fae8d53bdf08e9783 |
Docs: man:smbd(8) |
man:samba(7) |
man:smb.conf(5) |
Main PID: 15836 (smbd) |
Status: "smbd: ready to serve connections..." |
Tasks: 3 (limit: 18519) |
Memory: 23.1M (peak: 23.9M) |
CPU: 168ms |
CGroup: /system.slice/smbd.service |
├─15836 /usr/sbin/smbd --foreground --no-process-group |
├─15840 "smbd: notifyd" . |
└─15841 "smbd: cleanupd " |
|
oct. 12 14:55:09 Servbian systemd[1]: Starting smbd.service - Samba SMB Daemon... |
oct. 12 14:55:09 Servbian update-apparmor-samba-profile[15829]: grep: /etc/apparmor.d/samba/smbd-sh… nom |
oct. 12 14:55:09 Servbian update-apparmor-samba-profile[15832]: diff: /etc/apparmor.d/samba/smbd-sh… nom |
oct. 12 14:55:09 Servbian systemd[1]: Started smbd.service - Samba SMB Daemon. |
Hint: Some lines were ellipsized, use -l to show in full. |
8. Configuration for ufw or firewalld
The idea of a firewall is to allow only what needs to pass in or out.
There are hardware firewalls, essentially boxes where you plug your PC on one side and the internet on the other (don't shoot me, it's a voluntary simplification).
In my case, the PC itself will host our software firewall between the network and us.
A quick tutorial here to install and configure it:
|
# installation |
sudo apt install ufw |
|
# connexion root complet (outil sensible) |
su - |
|
# ouverture des ports pour samba |
ufw allow 445/tcp |
ufw allow 139/tcp |
|
# rechargement des configurations |
ufw reload |
|
# activation de ufw |
ufw enable |
|
9.
Test from Another PC
You can either do this graphically or via command line as shown here:
|
# connection publique au répertoire publique |
smbclient //192.168.1.250/Public -N |
|
# tapez ls pour lister les fichiers, et faite ctrl+c si vous voyez votre arborescence |
ls |
|
# connexion en tant que stunivers au répertoire DATA |
smbclient //192.168.1.250/DATA -U stunivers |
|
10. Quick Troubleshooting Guide
| Symptom | Solution |
|---|---|
smbd does not start |
Use journalctl -u smbd -e --no-pager and testparm -s |
| Guest sees nothing | Set map to guest = Bad User, guest ok = yes in [Public], then restart smbd |
| DATA visible without login | Confirm access based share enum = yes and guest ok = no / valid users = stunivers in [DATA] |
| Access denied on DATA | Use smbpasswd -a stunivers, set ownership of /mnt/DATA, and add force user = stunivers |
| Guest cannot write | Set permissions for /mnt/DATA/Public (e.g., 777), ensure read only = no, and use force user = stunivers |
| Invisible from Windows | Check IP connectivity with ping, ports 445/139, firewall settings, and try using the IP address instead of the hostname |
| Group 1005 « UNKNOWN » | Cosmetic issue as long as stunivers is the owner; otherwise, use chgrp stunivers /mnt/DATA or create the missing group |


Comments
No approved comments yet.
Sign in with a commenter account to post a comment. Sign in.